All Activity
- Yesterday
-
Il problema della M725, cioè il PIN del chip U1 storto, è stato quasi risolto, ho raddrizzato il PIN, adesso devo saldarlo, per ripristinare le funzionalità originali, non ho idea di cosa faccia il chip, sopra c'è scritto GD7532, spero non sia un chip essenziale per il funzionamento, e che soprattutto non sia danneggiato elettricamente, perché mi sembrava in contatto con il PIN vicino, anche se nel peggiore dei casi, avrei un chip di ricambio, che potrei prelevare dalla scheda madre rottame, c'è però una differenza di nome, in quella è un HT6571, immagino sia lo stesso chip, o un chip sostitutivo, differenza di nome a parte. Attualmente nella scheda da provare, ci sono i jumper impostati per FSB 66 MHz, e multi 4.5X, quindi sembrerebbe che l'ultima CPU usata fosse un 300 MHz, in realtà sulle immagini che avevo visto, ho letto 233 o 266 MHz, alla fine questo importa relativamente, nel retro della scheda madre, c'è un adesivo del 07 1998, che dovrebbe essere la data di vendita della scheda madre. Dalle altre impostazioni dei jumper, vedo che la RAM funziona a 3.3V, e il chip BIOS invece a 12V, un valore normale forse per le vecchie MB, il chip è un DIP32, non ho controllato il marchio e il modello, perché dovrei rimuovere l'adesivo, per il momento non è necessario, però in caso di bisogno si può fare.

-
Oggi vedremo di fare qualcosa, tra le schede da provare ho la M725, in realtà ha un altro nome, come si legge sull'adesivo, c'è scritto MB-686BXA1, ma sono la stessa scheda con nome differente. Inizio con il notare, che ci sono due selezioni per FSB, 66 e 100 MHz, mi era sembrato di capire che il massimo fosse 66, quindi questo può essere interessante, se per caso volessi fare un overclock, tipici sono quelli del Celeron 300 portato a 450, attualmente il jumper sta su 2-3, quindi è selezionato il FSB 66, non so se esista una terza impostazione segreta, cioè senza alcun jumper, non credo che possa esserci, penso siano solo due le selezioni possibili, se il jumper sta su 1-2 il FSB va a 100, in entrambe le impostazioni, il PCI va a 33 MHz, il generatore di frequenza dovrebbe essere un CMA8864BF-26, magari cercando su internet un PDF, si potrebbe vedere se può generare altre frequenze, che in questa MB non vengono usate. Inizio quindi con il raccogliere e aggiungere, tutto il necessario per un primo avvio, c'è la possibilità di aggiungere altro in seguito, per il momento serve una CPU, una RAM, e una scheda video, per quest' ultima userei inizialmente una PCI, in seguito dopo aver accertato che il PC funziona, farei il cambio di VGA con una AGP. Come si vede, ho disponibile il bracket per l'audio integrato, lo collegherò in seguito, quando farò l'installazione di Windows, per il momento non è necessario, mancano altri bracket tipici delle schede madri PCCHIPS, quello con la porta PS2 e USB, non saprei se si possano collegare anche il modem e la LAN? Ma guardando la scheda, ho appena notato un danno hw da sistemare, un PIN del chip U1, è staccato, e a seguito dell'urto, tocca quello accanto, purtroppo per oggi non sarà possibile fare altro, nei prossimi giorni, dovrei iniziare a vedere se riesco a raddrizzarlo e risaldarlo, credo sia un danno da trasporto, purtroppo a volte succede, fortunatamente non è minuscolo, con un po' di lavoro, potrei riuscire a rimetterlo a posto.
- Last week
-
 Kenkir7130 joined the community
 -
Vedremo nei prossimi giorni, se potrò riassemblare il PC con la scheda madre PCCHIPS M725, attualmente c’è una S.7 della Jetway, in quel case 🏘. In origine, quel PC aveva un PII 300, in seguito l’ho usato in un altro PC, forse su una Soyo Slot1, dovrei cercare tra i PC senza case 🏘, e nel caso in cui lo trovo, dovrei sostituirlo con qualcosa di leggermente più veloce, penso un 400 o un PIII 500, in questo modo recuperò il 300, che potrò rimettere sulla M725. Tutto il resto è abbastanza semplice, per le RAM potrei mettere due pezzi da 64 MB ciascuno, avrei comunque la possibilità di aggiungere un terzo modulo, uno da 128 MB, sarebbe utile se serve parecchia RAM. L’audio è integrato, ho la staffa con le tre prese per jack, più la porta game, insomma basterà collegare il cavo alla MB, e caricare i driver, per questi forse ho un CD di un modello simile, è probabile che c’è ne siano alcuni che vadano bene , eventualmente non li trovassi nel CD, potrei sempre cercarli su I.N., insomma niente di complicato (immagino). Per la VGA AGP, servirebbe un modello AGP 2X, a memoria non ricordo se ci fosse una scheda Intel i740 da 4 MB, insomma devo solo cercare tra le schede che ho disponibili, penso che una ATI RAGE o qualcosa di simile, per un PC simile, possa essere adatta, purtroppo non ho schede tipo S3 Savage, che probabilmente sarebbero state più corrette (???). Ancora alcuni giorni, e poi dovrei riuscire a fare, test e bench, sia con la M725 che con la Jetway S.7 con K6-2-500@475.
-
 Galex5 joined the community
 -
 Benbel4185 joined the community
 -
More updates incoming for my build – today I'm showcasing a fresh batch of special fittings that will further enhance the project. Granzon G1/4" Multi-Directional Rotary Elbows These articulated fittings offer maximum flexibility for tube routing – ideal for creative loops and tight spaces. Model GD-X (Matte Black): Compact and aggressive design, they remind me of mechanical joints straight out of a spaceship. Model GD-SK (Polished Silver): Same function, but chosen in silver for a deliberate contrast, as if representing different modules or compartments of the hull. All the visual choices are inspired by the aesthetics of the Star Citizen universe. Meanwhile, airbrush tests are progressing better than expected, and I’m currently working in CAD to design custom stencils and patterns to give each part a unique Star Citizen look. Check out some photos below! More components have arrived, and I’ll be sharing them with you soon in detail… stay tuned!
-
Cos’altro aggiungere su questa scheda madre, alias PCCHIPS M725, per prima cosa , in passato ne avevo una molto simile (se non uguale), era in un lotto di PC che avevo ritirato, la CPU presente in quella scheda madre, era un Pentium II 300 MHz, quella CPU è risultata funzionante, e attualmente è in un altro sistema Slot1, purtroppo la scheda non riuscii a farla funzionare, e in seguito a danni hardware, non è stato possibile ripararla, quindi dopo tanti anni, ne ho cercato una uguale per ricostruire il PC, fino ad ora ne avevo trovate alcune molto simili, ma non uguali. Attualmente nel case 🏘 di quel PC, ho una Jetway con K6-2-500@475, penso che in seguito, dopo aver fatto alcune prove al banco, sostituirò la Jetway con questa M725, prima però, visto che dovrebbe esserci un HD e un Windows installato, farò alcuni bench, per poter confrontare i punteggi. Questa scheda, come ho già scritto, ha l’audio integrato, quindi diciamo che non è necessario aggiungere altre schede, tranne che serva una scheda particolare, ad esempio una LAN o modem, per queste però ci potrebbe essere la predisposizione, sulla scheda madre ci potrebbe essere un connettore apposito, di solito sulle schede madri PCCHIPS, c’è molta integrazione, per cui potrebbe bastare un apposito bracket, per aggiungerne una o entrambe, quindi non serve alcuna scheda ISA o PCI, insomma gli slot di espansione, pur essendo pochi, restano tutti liberi. Per ulteriori info e curiosità, si può trovare, tutto il necessario su: https://theretroweb.com/motherboards/s/pcchips-m725
-
Rieccoci qua, oggi ho tempo di scrivere qualcosa, per questo fine settimana sarò abbastanza impegnato, e devo rinviare l’installazione di qualsiasi Windows, perché richiede circa un ora, e questo è parecchio tempo ⏱. Posso anticipare la prossima scheda madre che proverò, è abbastanza interessante , ma questo genere di schede madri, non era molto comune, era però molto economica, dava la possibilità di aggiornare qualsiasi PC Pentium (o inferiore). Di che si tratta? Di una scheda madre AT slot1, con audio integrato, ho già alcune schede simili, questa è identificata come PCCHIPS M725, in realtà è una MB686BX-A1, lo stesso modello con nome e marchio diverso, contrariamente a quello che si può immaginare , il chipset non è Intel, ma ALI M1621 (N.B.) e M1543 (S.B.). Oltre al connettore di alimentazione AT, è presente quello ATX, c’è uno slot AGP 2X, tre slot PCI e due ISA, per la RAM abbiamo la possibilità di usare tre SDRAM, a seconda della capacità dei moduli, possiamo al massimo arrivare intorno al mezzo giga. Per questo PC, dovrei usare un Celeron 300 o 333 slot1, se ho letto bene , non ha FSB 100 , quindi potrebbe essere necessario uno dei primi Pentium II, ma non penso di averne a disposizione, forse però, potrei recuperarne uno, cambiando CPU in alcune MB Intel BX, sono sicuro che ci sia qualcosa del genere, e che posso cambiarlo con un Pentium 2-3 400-500.
- Earlier
-
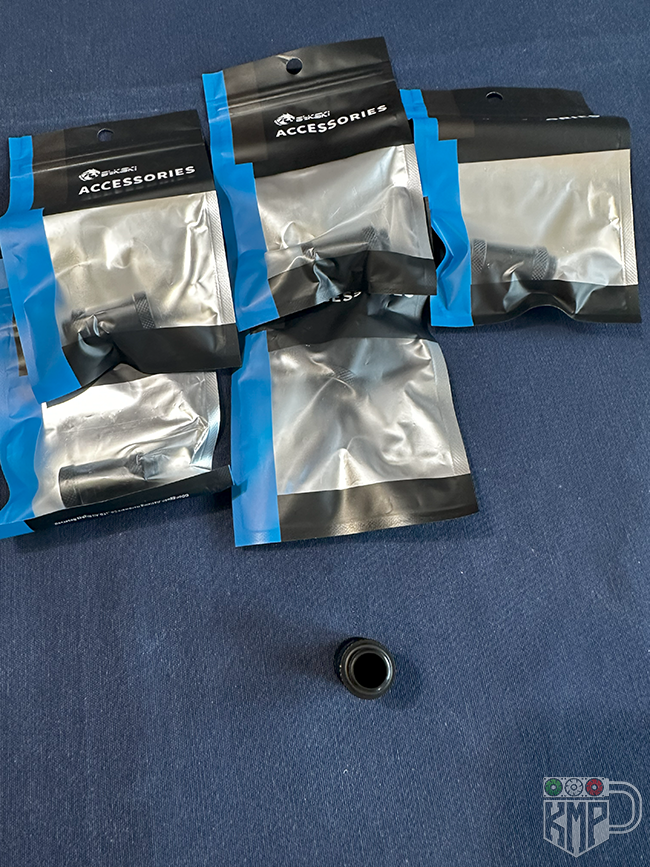
Hey everyone! As promised, here’s another batch of Bykski accessories that will enrich the custom liquid cooling loop of my Star Citizen build. These are G1/4 extenders of various sizes, including adjustable telescopic models, perfect for bridging precise gaps between components—especially useful in more complex layouts. The black extenders have a clean, technical look, while the chrome shut-off valve adds a nice touch of contrast. I’ve also received a set of end plugs with the Bykski logo, always handy and visually consistent. On the customization front, I’ve started airbrush painting tests, experimenting with finishes and textures inspired by the Star Citizen universe. I’m also working in CAD to create custom stencils and graphic details that will be applied to visible components later on. Here are a few pics—and more accessories are still to be shown in the next updates, along with some previews of the visual customization work. All items shown were personally purchased, allowing me to maintain full creative and technical control over the build.
-
Oggi ho fatto delle prove di RAM, sulla ABIT SE6, inizialmente avevo una RAM da 64 MB PC133, in seguito avevo aggiunto una seconda RAM da 256 MB, ottenendo in totale 320 MB. C’era qualcosa che non mi convinceva , una delle due non sembra essere una PC133, ma potrebbe essere una PC100, stiamo parlando di quella da 256 MB, dal programma diagnostico QTPRO, ottengo questi risultati, quella da 64 MB è una PC133, ed ha chip da 6ns, mentre quella da 256 MB risulta una PC100, con chip da 8ns, malgrado questo da BIOS leggo 133 MHz, quindi forse è in grado di funzionare comunque a 133 MHz? Provando altre RAM da 256 MB, in cerca di qualcuna che abbia chip da 6ns, esaurisco le RAM disponibili, perché ne ho pochissime, e perché alcune vengono lette a metà della capacità, quindi decido di provare con due RAM da 128 MB, il totale scende a 256 MB, ma nel complesso può andare, e in ogni caso potrei aggiungere una terza RAM, per ottenere 320 MB o più, dipende dalla capacità che userei. Le due RAM gemelle da 128 MB (faccia singola), dal diagnostico, risultano ancora ️ delle PC100, ma i chip sono da 7ns, all’avvio si può leggere un totale di 256 MB, funzionante a 133 MHz, per adesso mi accontento di questo, non credo serva cambiare ancora ️ RAM, per il momento non farò overclock, dovrei soltanto installare Windows in una scheda di memoria da qualche GB . Probabilmente utilizzerò un adattatore IDE 40PIN SD, con scheda di memoria SD da circa 8 GB , con questo spazio disponibile, potrei caricare un Windows, da scegliere tra 98SE ME 2000 e XP, forse quello più corretto (del periodo) sarebbe ME, ma in passato ricordo che avevo sul P3-800 Windows 2000, fortunatamente posso cambiare facilmente scheda di memoria, e potrei mettere una versione diversa di Windows in un altra SD.
-
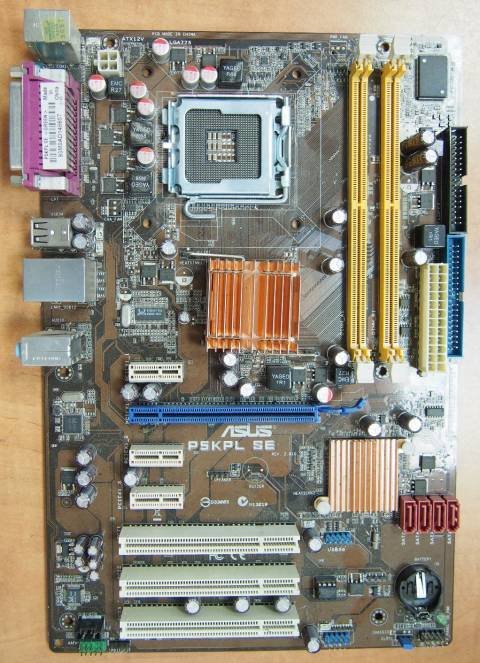
Purtroppo non ho avuto il tempo necessario per lavorare a qualche scheda madre, almeno negli ultimi giorni, ma adesso che ho qualche minuto, vorrei cercare di capire come risolvere l’assenza di codici post, di alcune schede madri. Recentemente ho provato delle 775, tra cui una ASUS P5KPL SE REV. 2.01G, purtroppo malgrado la sostituzione di qualche condensatore, visibilmente rigonfio, nei vari tentativi di avviare, nessun codice post, è stato visualizzato! Proprio di recente, ho rimosso il chip BIOS, ed ho estratto il contenuto salvandolo in un file, essendo possibile salvarlo, il passaggio successivo dovrebbe essere, provare ad esaminare il file, se risulta essere funzionante allora, si può escludere che il problema sia dovuto ad un BIOS danneggiato, potrebbe essere sbagliato , ma penso che qualche codice sarebbe visualizzato. Quindi direi che c’è qualcosa che non va, dovremo escludere che sia la CPU, usandone una proveniente da un PC funzionante, ma se non vediamo alcun codice post, è possibile che qualche pin non faccia contatto, oppure abbia uno strato di ossido, che impedisce la conduzione? Certo però ci sono ancora ️, parecchi controlli da fare, per esempio con un apposito strumento , dovremo verificare le frequenze dei quarzi, se vengono generate, se sono presenti negli slot PCI, ecco questa cosa non so se sia visibile nella post card, teoricamente si, perché c’è un LED CLK, quindi se è acceso, dovrebbe indicare che nello slot PCI ci sono 33 MHz, ma non credo che quel LED indichi la frequenza esatta, penso che se ci sono 33 o 50 o 20 MHz si accende, e sta spento solo quando la frequenza è assente del tutto. Ma potrebbe essere benissimo, un SMD minuscolo, a creare il problema, o perché è rotto , o perché è saltato via, in questo ultimo caso, solo un attento sguardo può trovarlo. Ecco queste sono solo una parte delle cose che bisognerebbe controllare, e naturalmente vanno controllate le varie tensioni, a volte può capitare che ci sia qualche altro condensatore difettoso, e non sia rigonfio, anzi visivamente è perfetto , ho visto in alcuni video, che scaldando con l’aria calda, la scheda madre può iniziare ad avviarsi, ma potrai capire esattamente dove sia il problema? Difficile ma non impossibile, per questo motivo, si cerca di rinnovare le saldature, di SMD o altro presente in quella zona, a meno che si tratti di chip BGA, o roba minuscola, si può fare con un saldatore a punta fine.
-
Si Grazie mille Sulla Abit SE6 era quello che pensavo, ma avevo capito, che le frequenze visibili in alto a pag 23 del pdf, fossero le sole possibili, invece come giustamente si può notare, bisogna cambiare in User Define, per selezionare FSB da 50 a 250 MHz, chiaramente con un P3-1000, non è possibile salire molto oltre i 1000, i Tualatin Celeron 1000, possono arrivare a 1500 con FSB 150, oltre e verso i 166 MHz invece iniziano a notarsi instabilità, che potrebbero essere risolte, tramite alcune mod, che personalmente non sono in grado di fare, anche se alcune schede madri hanno mantenuto la selezione del FSB tramite jumper, e questo può risolvere problemi che si manifestano, quando invece della selezione automatica si passa a quella manuale. Purtroppo ABIT, come tanti altri marchi, è sparita da diversi anni, e questo per alcuni appassionati del marchio, e io tra questi ovviamente , ci costringe a trovare delle schede da poter recuperare , ultimamente avevo lavorato su una S.462 (KG7 Lite), purtroppo ho sospeso i lavori, forse in seguito potrei riprendere da dove avevo lasciato. Per il momento sono da fare, alcuni upgrade, il primo l’ho fatto ma devo cambiare la RAM da 256 MB, attualmente sono a 320 MB totali, ma potrei arrivare anche a 512 MB se necessario, poi dovrei caricare un Windows su una scheda di memoria con adattatore, e in seguito farci alcuni bench, tra cui quelli di CPU-Z e altri simili. Attualmente devo risolvere un problema, con le immagini, perché ho esaurito lo spazio libero nel cellulare, in seguito tornerò a metterle, per il momento potrei, ma saturerei totalmente lo spazio residuo.
-
Molto bella questa Abit SE6 socket 370 con il Pentium 3-1000!! Come tutte le Abit, dovrebbe essere molto incline all'overclock quindi magari se hai tempo e voglia, sarebbe interessante vedere qualche test e benchmark del genere Sul manuale di istruzioni, che si può scaricare da qui: https://theretroweb.com/motherboard/manual/se6-5f0df927b1150422554137.pdf vediamo che nel BIOS è già possibile impostare la frequenza dell'FSB (addirittura fino a 250 Mhz) cosa che a quei tempi era veramente una novità, infatti per quasi tutte le altre MoBo si poteva effettuare soltanto tramite i classici jumper. Pag. 22: Pag 23: Veramente è un peccato che questo marchio sia poi scomparso! Per quanto riguarda la quantità di RAM, confermo che con 64 MB Windows XP gira con molta difficoltà, (è proprio la quantitò minima che consente di fare l'installazione) specialmente le versioni con il SP2 e SP3, mentre va leggermente meglio la versione originaria RTM cioè quella uscita a fine 2001. Per un funzionamento ottimale di questo sistema operativo e fare anche qualche benchmark più complesso (CPU-Z, SiSoftware Sandra), occorrono almeno 128 MB
-
 The Setup Menu includes two pages with tabs for Language, Resolution Notice, Information, OSD Timeout, OSD Background, OSD Pivot, Power Indicator, Auto Power Off, Sleep, ECO Mode, DisplayPort Version, DisplayPort MST, HDMI Version, DDC/CI, Auto Detect, and All Recall. For daisy chaining, DisplayPort versions 1.1 (without MST), 1.2, and 1.4 are supported. The VG2757V-2K features a rich array of OSD options, with an emphasis on its ease of use in office and conferencing environments. In addition to these functions, it also provides a high degree of freedom and flexibility with regard to color. vDisplayManager also includes many OSD functions, which would be more convenient than using OSD buttons located on the back of a monitor. However, with the touch buttons located on the front of the VG2757V-2K, along with various other shortcuts, in practice users may find these more intuitive to use than the software. Now let's look at the monitor in action. I felt that the webcam's performance and image quality were quite good during video calls made with Skype and Line. With its adjustable color temperature and brightness, the LED fill light had a good effect, and the ability to tilt the angle was somewhat useful, too. I'm including here a picture from the ViewSonic website demonstrating a video conference with multiple participants, which shows how a dual monitor setup using the VG2757V-2K might improve efficiency at work. I connected an HDMI cable that supports a 100Hz refresh rate and opened the UFO Test website to test the screen's refresh rate. The difference is not noticeable from Windows screenshots, so this article uses frame grabs from the recorded video instead. Please see the video embedded within this article for detailed dynamic tests. Of the three frame rates tested, 100fps performed the clearest, while static screenshots depended on the number of frames per second. It was immediately apparent that 100fps had the most frames and relatively clearer separation, which marked the biggest visible difference between them. In the vertical text scrolling test, the frame grabs from the video likewise show that 100 fps had more frames that appeared to be more distinctly spread out. In the video, the higher frame rate shown on the left is both smoother and clearer. With the HDMI port's refresh rate upgraded from 60Hz to 100Hz, these specs are more than adequate for the demands of an office environment. Here is my subjective experience of listening to the VG2757V-2K speakers: With the volume turned all the way up, the sound is loud for an indoor environment: there would not be any issues with insufficient volume during regular use. Treble - Higher frequencies are not too sharp, and quite rich in details. Overall performance is of a high standard. Mids - Excellent clarity overall. Human voices are slightly lacking in fullness, leaving some room for improvement. Bass - Bass drums sound quite clear, but the deep bass is lacking impact. The speaker design is mainly geared towards clarity, with no apparent soundstage to it, making it most suitable for office and conference use. Sound quality is decent for watching videos or listening to music. Audio performance is of a relatively higher quality compared to other monitors with built-in speakers, opening up the possibility of replacing external speakers with these inbuilt ones when desktop space is limited. A sound quality test using the human voice can be found in the embedded video. When the base is aligned with the edge of a desk, the distance from the edge to the screen is about 18cm, and the distance to the furthest side of the stand is about 22cm. Even on a relatively shallow desktop (about 60cm deep), that still allows for plenty of usable space. When connected to a 17-inch laptop, the rear USB-C PD 90W charging and display port was detected with a 90W charging spec. A maximum of about 83W was measured during actual use, which is enough for charging business notebooks with a maximum 65W charging spec. The USB-C port on the side supports 15W charging, and measured a maximum of about 12.2W when connected to an iPhone 15 Pro Max. I applied the Windows 11 color profile VG2757V-2K 6500K, and used my Spyder color calibrator to compare it against the factory settings. The official website additionally provides a screen driver that can be downloaded and installed. With color mode turned off and brightness set to 50, the colors appeared to be on the cooler side. The panel comes with IPS technology, which gives better saturation than VA panels do. There's no noticeable color fading when viewing from a sidelong angle, either. After calibrating with a Spyder, the colors tended towards warmer tones. The VG2757V-2K offers multiple color modes and various options for making detailed adjustments, so even without a calibrator you can tweak the colors to your individual preferences. I connected a laptop via the Type-C output to the VG2757V-2K on the right to use as a second screen. As the monitor supports daisy chaining, I then used its DisplayPort outlet to connect it to the 32-inch screen on the left and enabled the MST function. I was able to use the laptop for writing articles or reviewing product specs, while using the other two screens for editing pictures and video production. If you're skilled at this sort of thing, a multi-monitor setup like this can really improve your efficiency and boost your productivity. Notebooks generally lack an ethernet port due to their slim designs, but with the VG2757V-2K's inbuilt RJ45 ethernet port, you can achieve an optimal network speed and stability. The dual USB-C ports allow you to simultaneously charge both a laptop and a phone, simplifying your desktop by removing the need for additional adapters and charging cables. To summarize, the ViewSonic VG2757V-2K features a stylish, multifunctional stand and advanced design with its 5MP pop-up webcam as a highlight. It additionally boasts a 100Hz refresh rate, dual 5W speakers, Eye ProTech+ features, intuitive OSD buttons and functionality, support for daisy chaining, and two USB-C PD 90W and 15W charging ports. These features allow for an efficient multi-monitor setup and reduced cable clutter even in work environments with limited desktop space, allowing for greater productivity. I hope that we'll have the option of a 32-inch version soon, too. Monitors like the VG2757V-2K, with built-in cameras for office meetings and videoconferencing, are quite rare in the current market in Taiwan. Currently positioned at the high end of the market, this model is a new option well worth your consideration if it matches your budget and work requirements.
 -
The Basic page includes tabs for general settings such as Color/Image Adjust, ViewMode, and Input Select. Contrast, brightness, and sharpness are all commonly adjusted settings when first using a new monitor. Nine presets can be found under ViewMode. The Advanced page includes Information, Power Indicator, Profile Saving, and All Recall tabs. The software language can be set to English or Japanese. OSD Menu: Moiré patterns often appear when shooting an LCD screen with a digital camera, but the screen appears as normal to the naked eye. Options for volume adjustment, input signal source, and the main menu appear under Quick Mode. The icon-based touch buttons each represent a quick setting option. For example, the second button from the left opens the LED fill light settings. After entering the main menu, there are six main tabs: Input Select, Conference Mode, ViewMode, Color Adjust, Manual Image Adjust, and Setup Menu. Conference Mode includes settings for the LED fill light, speaker volume, speaker mute, and microphone mute. The ViewMode tab offers settings including Off, Office, Movie, MAC, Mono, and Game. Users can select a mode according to their environment, with detailed options for further fine-tuning within each preset. For example, in Office mode, the Custom 1 preset can be adjusted for Low Input Lag, Black Stabilization, Advanced DCR, Response Time, Hue, and Saturation, and can also be renamed and reset. The Color Adjust tab offers options for Contrast/Brightness, Color Temperature, Color Space, Color Range, and Gamma. Color Temperature settings include Bluish, Cool, Native, Warm, and custom color adjustments. Manual Image Adjust includes options for Sharpness, Aspect Ratio, and Overscan.
-
The following ports appear on the back, from left to right: power input, HDMI 2.0, DisplayPort input, USB-C (upstream 90W), DisplayPort output (for daisy chaining), RJ45 Ethernet (1,000Mbps), USB-A 3.2 x3 (downstream).https://i.imgur.com/nXav8og.jpeg When it comes to ease of use, both the stand and the base are crucially important in a high-end monitor. The VG2757V-2K stand provides multiple options for adjustment, and the base features a rotating design not often seen in this class of monitors. The stand's silver coating gives it a high-tech look, with a handle-like grip at the top and holes at the bottom for gathering and organizing cables, ensuring a neat and tidy desktop. The stand and base have a combined weight of 2.5kg, and the metal feels quite weighty to pick up. With the monitor installed the total weight is 8kg, lending a high degree of stability both in normal use and while making adjustments. The base supports horizontal rotation of up to 120° to both the left and right. A USB-C port on the left side of the monitor allows for data transfer and charging up to 15W, alongside a 3.5mm audio output, allowing for easy and direct connections with smartphones and headphones. The stand's height can be adjusted by 110mm. This photo shows the lowest possible height. In addition, it can be tilted up to 40° upwards and 5° downwards. The screen can be rotated 90° clockwise or counterclockwise, and supports vertical display. When rotated to the vertical position, the distance between the screen and the base is about 3.3cm when raised to its highest point. This makes it suitable for office meeting reports, portrait photo and video editing, or even for entertainment such as reading comics. Having used a handful of high-end monitors priced above 10,000 NTD, I've found that with some models the stand cannot be disassembled, and vertical tilts are the only adjustments that can be made. By comparison, a while ago I was using high-end monitors in the 20,000 to 40,000 NTD range which featured multifunctional stand designs similar to those found here. The VG2757V-2K is highly adjustable, with a wide range of adjustments available which make it highly flexible in workplace environments with space limitations. The bespoke vDisplay Manager software offers several key features as shown on the left, organized into Productivity, Eye Care, Video Conference, Basic, and Advanced tabs. The Productivity page offers Screen Pivot options for rotating the screen by 90° clockwise or anticlockwise, as well as a reset option. The Screen Split tab offers six different presets for screen splitting and customization, while Frame Customization sets the color and thickness of the frame. The third tab is AutoLaunch, which captures and stores specific application windows so that they automatically launch the next time vDisplayManager is reopened, allowing you to continue from where you left off. The Eye Care page offers options for adjusting the Blue Light Filter, Smart Blacklight, and Color Filter. The Smart Backlight allows you to adjust brightness and contrast for different times of the day using three settings: Energy, Focus, and Relax. The Color Filter feature is designed for users with color vision impairments, helping them to better distinguish between colors and see details on screen with greater clarity. This was originally one of the standout features of the app, and is now primarily supported by the VP and VG series of monitors. The company website offers a complete list of supported models. When the Webcam function is enabled, a window similar to the Windows Camera interface will pop up, offering photo-taking functions and a 1080p option. In addition, QR codes can be scanned, and passport photos can be taken in three different sizes. Brightness, contrast, and sharpness can all be adjusted, and filters such as Beauty, Lomo, and Cartoon can be applied. Images can also be rotated by 90° clockwise or anticlockwise, or flipped horizontally or vertically. The LED fill light tab offers three settings for color warmth, and low, medium, and high brightness settings.
-
The extent and range of angles to which the stand and webcam can be adjusted are clearly shown in this video, along with a demonstration of the speaker audio: As technology advances and develops, the different varieties of communication software now available are growing more and more diverse. What's more, the shift towards working from home and attending classes remotely in the wake of the pandemic has made electronics with videoconferencing capabilities ever more crucial, and desktop monitors with built-in cameras are well-placed to meet this growing demand. ViewSonic have been in the monitor market for a long time, with products broadly divided into value, office, gaming, and creative ranges. The VG2757V-2K is one of their latest offerings: a high-end monitor designed specifically for work and office environments. Let's start by looking at the VG2757V-2K's display. The screen is frameless on the left, right, and topmost sides, giving it a straightforward and enlarged appearance. The 27-inch IPS panel has an anti-glare 3H hard coating and 2560x1440 resolution, commonly known as 2K or Quad HD, and a viewing angle of up to 178 degrees. It has a 100Hz refresh rate, 8-bit color, 5ms response time, and 350cd/m² brightness, and comes equipped with Eye ProTech+ anti-blue light and flicker-free technology, which effectively reduces eye strain during extended periods of use. It has a static contrast ratio of 1,300:1 (with a dynamic contrast ratio of 80M:1), and 100% sRGB color coverage (108% size/100% coverage). Beneath the panel are two 5W speakers. On the right are touch buttons for operating the OSD, which are something of a rarity in monitor designs today. The webcam boasts a 5-megapixel lens that pops up when pressed and can be hidden away for privacy when not in use. The white areas to the left and right of the lens are LED fill lights that illuminate the face and can be adjusted for color temperature and brightness. The lens supports Windows Hello and is Zoom-certified. The camera lens can be tilted up to 5 degrees up or down: in this picture it's tilting 5 degrees upwards. It's not a huge adjustment, but it does make a noticeable difference in practice. Accessories include a 3-pin power plug, USB Type-C to Type-C cable, USB Type-A to Type-C cable, DisplayPort or HDMI cable (depending on region), and a quick start manual. The monitor comes with five years' full warranty and a one-year dead pixel guarantee within the Taiwan region. The box is made of recyclable cardboard, emphasizing environmental friendliness and reducing plastic waste, while the monochromatic print minimizes pollution from dyes. Set-up and installation is easy thanks to the internal design of the box, which allows the stand to be assembled without the need for tools. The ViewSonic logo appears on the back of the VG2757V-2K, while the words VG COLLECTION appear on the top and lower right of the stand. When the stand is not attached, 100 x 100mm holes can be used for convenient VESA wall mountings.
-
Dunque, ho sul banco la ABIT SE6 con il P3-1000, attualmente ha soli 64 MB di RAM, che vanno bene solo se si vuole installare un Windows 98SE o ME, è vero che XP gira anche con soli 64MB, e forse persino con soli 32MB, ma in questo caso, sarebbe abbastanza fastidioso, perché rallenterebbe troppo l’avvio, facendo un continuo ricorso al disco fisso, comunque per farla breve, ho pensato di aggiungere una RAM, e lasciare quella già presente (almeno per il momento), in seguito, dipende da quanta RAM metterò, potrei toglierne una o persino entrambe. Penso di aggiungere un modulo da 128 MB o 256 MB, in passato sui PC i815, ho messo un modulo da 256 MB più due da 128 MB, ed è abbastanza comodo se non si hanno due moduli da 256 MB, qui c’è questa possibilità, dato che la scheda madre dispone di tre banchi RAM. Tra le RAM che ho selezionato di recente, ho un modulo da 256 MB, lo inserisco nella MB e ottengo 320 MB totali, non male, il problema con Windows XP viene risolto, e si può ancora ️ far meglio, arrivando a 512 MB con altra RAM, il modulo che aggiunto, non mostra che PC1XX sia, avviando il PC la RAM funziona a 133 MHz, dal programma diagnostico QTPRO invece, risulta essere una PC100, quindi penso di sostituirla con un altro modulo da 256 MB, e vedere se effettivamente sarebbe un PC133, se avessi parecchi moduli RAM da 128 MB, magari uguali, potrei arrivare a 384 MB con tre moduli identici. Nei prossimi giorni, dovrei fare altri upgrade, per il momento non userò schede video AGP, ma utilizzerò quella integrata, voglio fare qualche bench in Windows, per capire come va, il confronto potrei farlo in seguito, se otterrei risultati deludenti, attualmente la VGA a bordo dispone di solo 1 MB, non so se sia possibile aumentarla a 2 o 4 MB, forse dal BIOS magari, passare a 4 MB forse non aumenta le prestazioni, ma dovrebbe permettere risoluzioni maggiori.
-
Oggi appena avrò qualche minuto libero, vorrei riavviare un PC che ho sul banco, è parecchio che non lo avvio, di che si tratta? Di una scheda madre a marchio Olidata, modello OLI-BX, sarebbe praticamente la ASUS P2B, con marchio e modello personalizzato anche nel BIOS, ma solo in quelli di fabbrica, nelle versioni recenti e quelle modificate per i Tualatin, invece non c’è che io sappia, un BIOS personalizzato da Olidata, fino a circa 10 anni fa, c’era online il sito Olidata con la sezione per scaricare driver e BIOS, ricordo di aver scaricato il BIOS di due PC, che ho aggiornato con successo, non so se sia possibile oggi accedere a quelle pagine, se si, non credo si possa scaricare qualcosa. Torniamo alla Olidata OLI-BX, da non confondersi con la OLI-BX3 che è l’equivalente della ASUS P3B-F, fortunatamente ho anche quella con un P3-600, anzi dovrei vedere di rimetterlo in funzione giusto per fare un confronto; nella OLI-BX c’è un P3-500, in questa scheda madre ho usato vari adattatori per schede di memoria, sia CF che SD, ho quindi tre OS disponibili, DOS Windows 98SE e XP, in un recente video che ho visto su YouTube, c’è la possibilità di fare a meno di tutto ciò! Si, perché ha utilizzato un micro OS, che ha scritto su un chip BIOS, e lo ha installato in una scheda LAN, secondo me è molto interessante, perché nelle prove delle MB, a volte si possono trovare difficoltà, che puoi risolvere cambiando adattare o scheda controller, parlo di PC con slot ISA, e magari antecedente al 486, il video è questo qui: https://m.youtube.com/watch?v=uBpgABajHdw&t=64s
-
Ultimamente ho temporaneamente sospeso, i lavori con i S.7, in particolare la sperimentazione del VCORE sulla Soyo 5BT5, anche a causa dei tentativi falliti , di riparare le schede madri tramite riprogrammazione chip BIOS. Avevo immaginato che alcune schede madri, potessero avere un BIOS talmente danneggiato o sbagliato , da non mostrare alcun codice post, la realtà ha detto invece il contrario, cioè che il BIOS sembra essere OK, e la mancanza di codici è da attribuire ad un guasto hw, ci sono poi alcune schede madri, che mostrano un accenno di avvio, ma anche lì potrebbe esserci il guasto hw. In particolare cosa volevo fare sulle S.7 funzionanti? Per prima cosa , volevo estendere le CPU supportate, alcune schede del periodo i430 (VX HX TX), non hanno tensioni inferiori a 2.8 VCORE, altre arrivano a 2.5V, alcune persino 2.2V, pochissimi arrivano a 2.0V, quest’ultimo valore consente l’uso di tutte le CPU S.7, ma esistono CPU con VCORE fino ad 1.5V, quindi bisogna overvoltare, se vogliamo usarle. La sperimentazione serviva a trovare il valore di resistenza, per tutti i voltaggi inferiori a 2.2V, fino a 1.3V, più giù non saprei se sia possibile scendere , comunque avevo pensato di realizzare una scheda aggiuntiva per la selezione del VCORE desiderato, ad esempio se volessimo 1.8V, avremo un jumper in corrispondenza di una resistenza xxx KOHm, tutto abbastanza semplice, basta spostare il jumper sul valore desiderato. Ma serve undervoltare? Ebbene, in un video fresco di pubblicazione, c’è questo argomento, oltre all’overclock di due CPU differenti, entrambe S.7, di solito per stabilizzare le CPU, si deve overvoltare, e per raggiungere alte frequenze, si è obbligati a ricorrere all’overvolt. Si trova qui: Spero che i risultati ottenuti, si possano replicare, sui propri PC, sulla 5BT5, avevo undervoltato un P233MMX fino a 2.2V, in seguito ho trovato tutte le resistenze per i voltaggi da 2.3V fino a 2.7V, il prossimo lavoro sarà trovare quelle da 2.1V in giù.
-
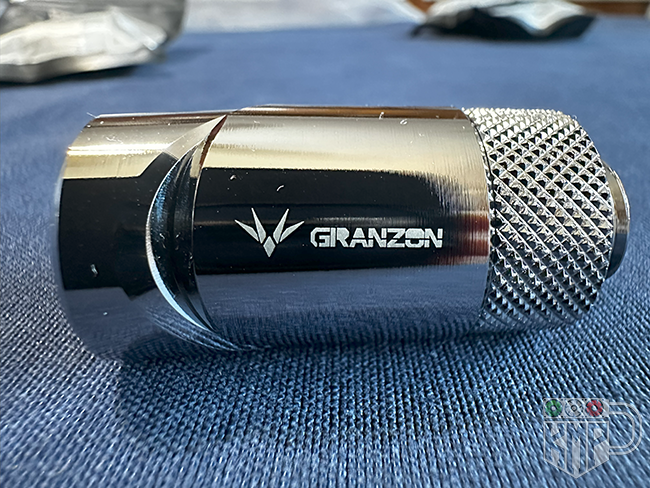
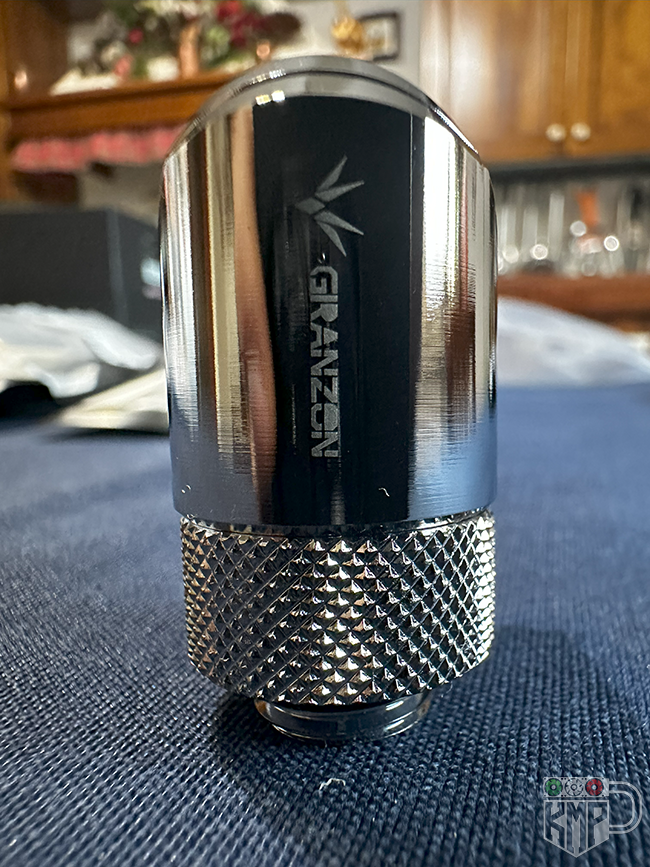
Granzon Fittings Have Arrived Hey everyone! Time for another update: I’ve purchased the Granzon fittings for the custom loop, and the first batch has arrived! All the fittings you see in the group photo are the same model: these are 14mm hard tube compression fittings, with standard G1/4 threading. I chose them for their sharp, clean design, which fits perfectly with the technical and futuristic look I’m aiming for in this Star Citizen-themed build. I’ve included a few close-up shots to show the details: glossy black finish, engraved logo, and a very solid construction. First impressions are great—precise threading, a secure grip on the locking ring, and a generally high-quality feel overall. Other types of fittings have also arrived, but I’ll be showcasing them in future updates, along with some photos of how they’ll be used in the system. Soon, I’ll start working on the tube bending and fitting layout, where these will really begin to shine. One step at a time, we’re building the heart of this spaceship.
-
 2kPro changed their profile photo
 -
L’ABIT SE6 con chipset i815E, con audio e video integrato, è da quello che ricordo l’unica ad avere il video integrato, le altre i815 che ho non hanno la VGA integrata, ma solo lo slot AGP, almeno se ricordo bene . Le altre i815, sono una ABIT SA6 con P3S1400 (modificato), una ASUS TUSL2-C con un P3S1400, una ACorp 815EP con P3-1000-133, poi anche una Siemens D1217 con P3-933-133, non credo di averne altre, più che altro mi sembrano schede abbastanza robuste, l’unico problema è nei condensatori elettrolitici scadenti, per il resto posso solo dire che l’ACorp è stata per un paio di anni il mio miglior PC (intorno al 2005), inizialmente aveva un P3-800-133, in seguito trovai un 1000 molto economico, e l’ho cambiato. Tornando alla SE6, ancora ️ ci sono degli upgrade da fare, il primo che ho già fatto è il cambio di CPU, ho messo via il Celeron 900, e ho messo il P3-1000-133 che avevo sulle schede VIA per Tualatin, diciamo al momento, non si può mettere qualcosa di più veloce, tranne che si usa un adattatore Tualatin Coppermine. Inizialmente la memoria con il P3-1000, andava a soli 100 MHz, ma ho risolto andando nel BIOS, e con le nuove impostazioni, la RAM va a 133 MHz, anche se credo che il CL sia salito da 2 a 3. Fatti i bench di Phil’s con entrambe le CPU, posso confrontare i punteggi. 2) 196.6 | 216.8 3) 164.4 | 182.5 4) 51.4 | 66.6 5) 113.0 | 137.5 6) 45.2 | 58.8 a) 339.50 | 419.61 b) 82.08 | 97.51 c) 95.8 | 115.3 d) 38.7 | 46.8 n) 1023.78 | 1137.56 i punteggi più bassi sono quelli del Celeron 900-100, mentre quelli più alti sono del P3-1000-133.
-
 Relor7347 joined the community
 -
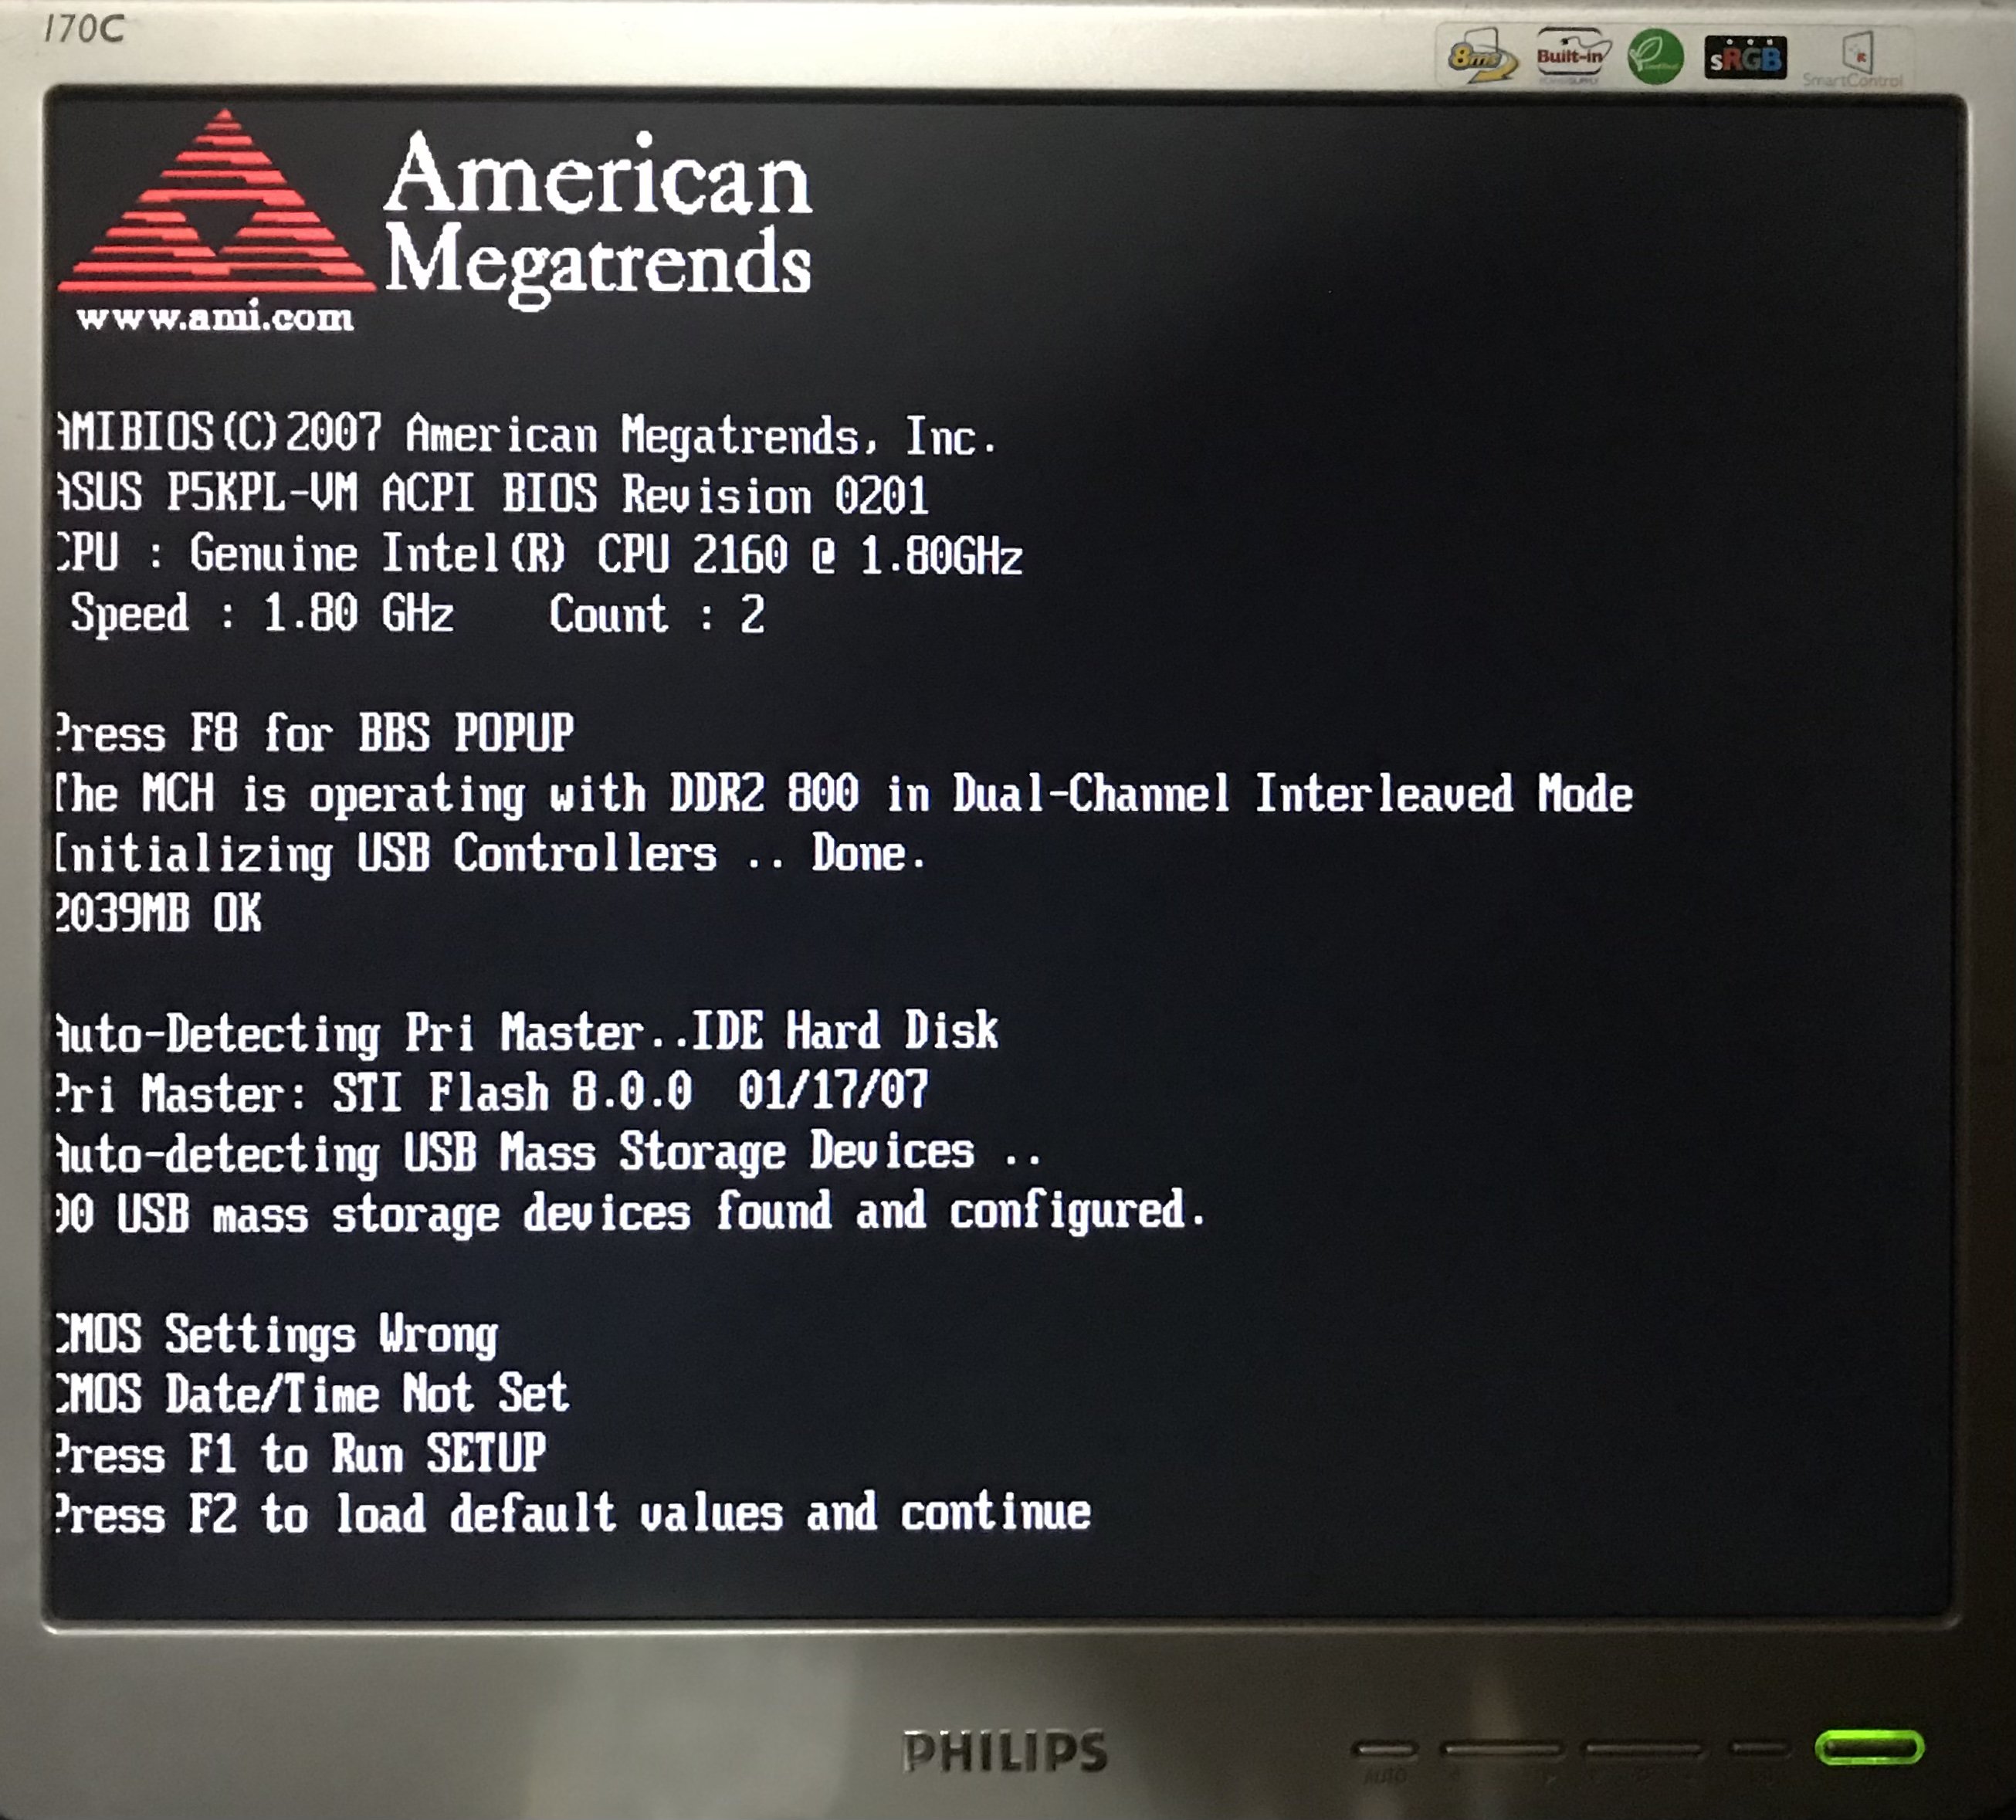
Ho risolto il problema del dual channel, sulla ASUS P5KPL-VM, ho sostituito le RAM DDR2 con altre da 1 GB , queste sono però identiche, e come pensavo, adesso va a 800 MHz, forse prima una delle due, è differente in qualche valore, e andavano a soli 667, pur essendo entrambe da 800. Proseguendo, ho provato l’avvio di altre schede madri, una malgrado la sostituzione di parecchi condensatori elettrolitici, non ha funzionato, si avvia visualizza FF — e si spegne subito, forse interviene la protezione da corto del alimentatore ATX, ma controllando le linee (pin del connettore), non trovo nulla di strano o sospetto , dovrò fare alcuni controlli, ma per adesso non ho il tempo necessario. L’ultima scheda che ho provato, è una ABIT SE6, una ATX con chipset i815E, audio e video integrato, volendo si possono mettere in alternativa, schede apposite, per il video c’è lo slot AGP, per l’audio e altro ci sono ben sei slot PCI, infine se servisse c’è anche uno slot CNR. Per la prova di avvio, uso una RAM PC133 da 64 MB, una CPU Celeron 900 Coppermine, e dopo aver collegato tutto il resto, provo l’avvio, dopo un paio di tentativi, riesco a vedere la schermata BIOS sullo schermo , OK funziona! Il prossimo passaggio, sarà aumentare la RAM, cambiare CPU, penso con un Pentium 3 1000/133, a questo proposito nel BIOS non è prevista una CPU 900/100 o 1000/100, e neanche altre oltre i 1000, forse dipende dal BIOS, che andrebbe aggiornato, ma il problema è solo all’interno del BIOS, per il resto si avvia e funziona con il C900, magari prima di cambiarlo, faccio i bench di Phil’s, che potrei confrontare con quelli delle altre schede chipset VIA.
-
Ho riavviato alcune schede madri, per vedere se riuscivo a fare progressi, qualcosa sono riuscito a capirla, ma non sono riuscito a far avviare alcuna scheda madre problematica o difettosa. Per questo motivo, ne ho messe via due tre, in seguito vedrò di capire dove possa esserci un problema, o vedrò di capire esattamente cosa significano alcuni codici post, visibili all’avvio, per esempio C0 —, significa che qualcosa fa, però si blocca subito, al momento non saprei perché, ma questo codice è uno di tanti che non capisco , sia perché non so il BIOS della scheda madre qual’è, ad esempio nella Compaq Camaro, può essere AWARD o Compaq? Passando alle schede madri provate, con successo cioè risultate funzionanti, ho ancora ️ sul banco la ASUS P5KPL-VM REV. 2.01G con E2160, sono riuscito a visualizzare la schermata, in cui è visibile in basso la riga con le info del BIOS AMI, non era importante ma da quella ho capito che il BIOS è quello di fabbrica, in pratica la prima versione, volendo potrei aggiornarlo, ma sinceramente non ne vedo il motivo, almeno per adesso, se in seguito farò degli aggiornamenti, o risolvesse eventuali problemi, potrei aggiornare all’ultima versione disponibile. Un aggiornamento che ho già fatto, è relativo alla RAM, ho aggiunto un secondo banco da 1 GB DDR2 800, per un totale di 2 GB , ma cosa più importante, è aver attivato il dual channel, in seguito potrei cambiare il quantitativo di RAM e la CPU, per il momento, non ho deciso cosa fare con questo PC, le dimensioni compatte (ma non troppo), sono sicuramente utili, avendo altri 775, è difficile scegliere cosa fargli fare, sicuramente non ci farò Internet, il PC che ho attualmente (i3) è perfetto , forse sarà semplicemente un PC di riserva, anche perché ne ho altri simili (775) da provare, e quindi potrei ritrovarmi con altri 775 funzionanti. Guardando le foto, ho notato che il dual channel, funziona a 667 invece di 800, come seconda RAM, ho messo una DDR2 800 della Kingmax, quindi di marchio diverso, a questo punto proverò altre RAM, stavolta identiche (coppia), per vedere se va a 800, oppure no?
-
Avevo tra le zampe una scheda madre 775, e ho deciso di provarla, l’unica riparazione che ho fatto, è stata la sostituzione di un condensatore elettrolitico, non era in pessime condizioni, ma ho preferito sostituirlo, come prevenzione, se poi funzionava o meno non saprei La scheda madre è una ASUS P5KPL-VM, uATX per CPU LGA 775, chipset Intel, due slot RAM DDR2 (di solito sono quattro), audio video e LAN integrati, c’è uno slot PCI-E 16X (per una scheda video), più uno slot PCI-E 1X, oltre a due slot PCI. Aveva già installata una CPU, un Pentium Dual Core E2160 da 1.8 GHz, di queste CPU ho avuto per un periodo un E2180 sul PC Linux E4700, tutto sommato una CPU economica, ma con prestazioni interessanti , anche se per compiti più impegnativi, può risultare un po’ lenta. Ho aggiunto il dissipatore e una RAM DDR2 800 da 1GB della Transcend, e ho provato l’avvio, inizialmente sembrava non partire , ma i codici post sono proseguiti, fino alla schermata BIOS, ho in seguito aggiunto il solito adattatore IDE 40PIN CF, e ho eseguito i Bench di Phil’s, i risultati non sono corretti, perché il DOS vede la CPU come un core singolo. Malgrado ciò, ecco quanto ha fatto: 2) 193.8 3) 212.5 5) 215.6 6) 82.4 a) 399.41 b) 72.44 c) 191.7 d) 71.9 e) 22.1 n) 2681.85 il bench 4) ha dato errore, e non è stato possibile ottenere un punteggio.
-
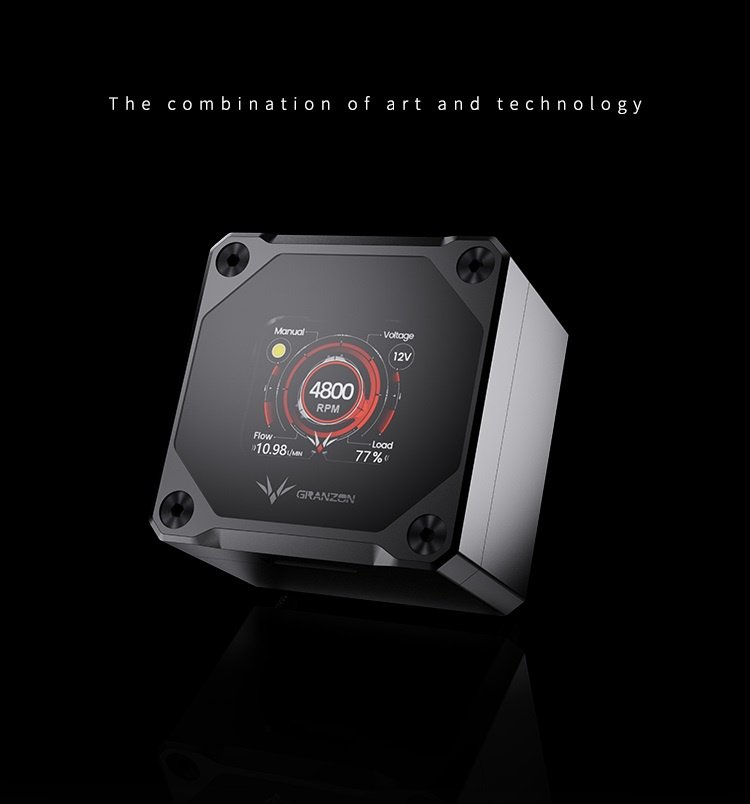
New Arrivals: Pump, Flow Meter, ROG Controller & Loop Tester Hey everyone! New batch of components just landed for the Star Citizen-themed build, and I had to share the latest additions with you! Granzon DDC Pump + Touch Display The Granzon DDC pump with integrated touch display is here—a sleek and powerful unit that blends functionality and aesthetics. Real-time readout of RPM, flow rate, voltage, and load Cockpit-style interface, a perfect match for the Star Citizen theme Compact and clean design, ready for custom visuals Bykski Flow Meter B-TFC-CS-X A must-have addition for the loop: the digital flow meter by Bykski. Shows temperature, flow (L/min), and rotational speed (r/sec) Minimalist and modern look, with a built-in display Will integrate seamlessly next to the secondary monitor HUD ASUS ROG Fan & ARGB Hub This hub will handle fan and RGB strip management across the build. Aura Sync compatible Plenty of ports for clean and centralized cable routing Electronic Pressure Tester Also added an electronic pressure tester for the loop. Essential for leak testing before powering on the system Helps ensure maximum safety and peace of mind during the first fill Sharing some pics of the new gear! As always, each piece will be integrated with care and style to reflect the Star Citizen universe, both visually and functionally. Some will even be customized with unique graphics—more updates coming soon!